
Most eCommerce stores treat product pages as the final stop before checkout. The visitor either buys or leaves. That binary thinking is leaving a significant number of potential customers behind, specifically the ones who are interested but not ready, who have a question they cannot find the answer to, or who want to be contacted before committing. Adding a PrestaShop lead generation form directly on a product page changes that equation. Instead of losing those visitors entirely, you give them a way to raise their hand. A name, an email, sometimes a specific question, and you have something to work with.
This is not complicated to set up. Here is exactly how to do it.
Why Product Pages Are the Right Place for Lead Capture Forms
Product pages get the most qualified traffic on any eCommerce site. Someone browsing a specific product has already moved past the awareness stage; they are evaluating. Product page conversion rates for items over $200 sit between 1-2%. For higher-ticket items, the gap between interest and purchase is wide. That gap is where a lead form sits.
A visitor who cannot find a size, wants to ask about bulk pricing, or needs to know about compatibility before buying is not a lost sale; they are a customer enquiry waiting to happen. A lead capture form on the product page makes that conversation possible without the visitor having to hunt for a contact page.
The form placement matters. Forms embedded in the product page footer or below the product images see higher engagement than generic contact pages because the context is already there, and the visitor is looking at the product when they fill in the form.
What the PrestaShop Form Builder Actually Does on a Product Page
The PrestaShop Form Builder lets you create any type of form, contact, enquiry, lead capture, quote request, and place it on a specific product page or across all products, without editing any theme files.
Forms are built using a drag-and-drop form builder interface. Add fields for name, email, phone, and a message. Set validation rules. Configure which fields are required. The whole thing runs from the admin panel, and the form goes live immediately after saving.
Two things make this particularly useful for product page lead capture. First, the PrestaShop Lead Generation Form Builder lets you target placement precisely; you can show a form on specific products only, which means a custom enquiry form for your high-ticket items and nothing on your standard catalogue products. Second, every submission triggers an email notification to the admin, so no lead sits unread in a back-office list that nobody checks.
How to Set Up a PrestaShop Lead Generation Form on a Product Page
Here is the step-by-step process using the PrestaShop Form Builder.
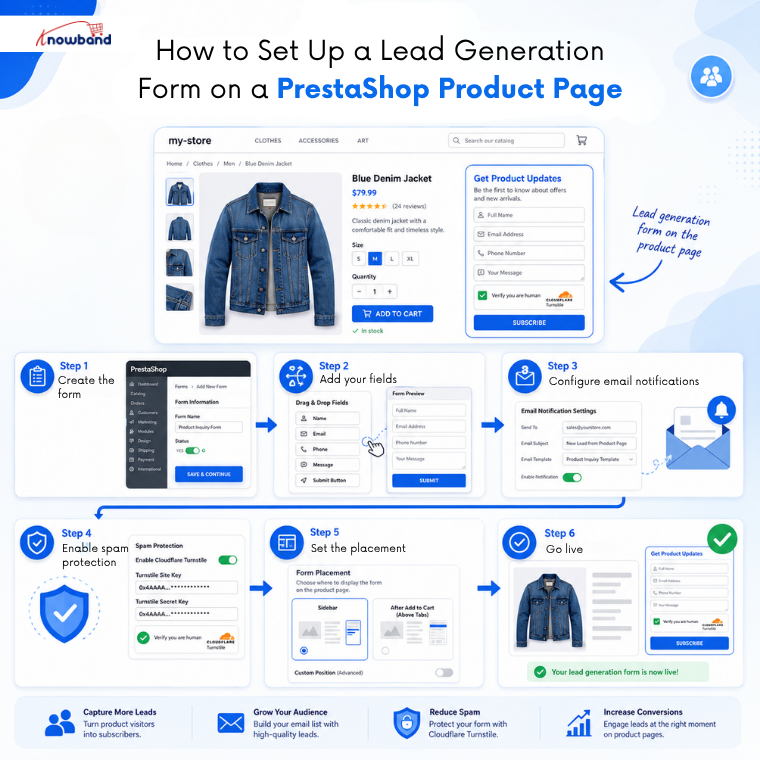
Step 1: Create the form
Go to the module in your PrestaShop admin and click Add New Form. Give it a name that identifies the product or purpose, something like “Product Enquiry, High Ticket Items” keeps it clear when you have multiple forms running.
Step 2: Add your fields
Drag in the fields your lead form needs. For a basic product enquiry form: Name (text field), Email (email field), Phone (optional, phone field), Message (textarea). If you are collecting leads for a specific product line, add a dropdown for product interest. Keep it short; form simplicity directly affects completion rates. Three to four fields outperform six or seven every time.
Step 3: Configure email notifications
Under Mail Settings, set the admin email address where submissions go. Write a subject line that makes submissions easy to identify in your inbox. “New Product Enquiry via [Form Name]” works. The PrestaShop Survey Module also lets you set up an auto-responder so the customer receives a confirmation immediately after submitting, which sets expectations and reduces follow-up messages.
Step 4: Enable spam protection
Toggle Cloudflare Turnstile on. This runs bot filtering silently in the background; genuine customers do not see any CAPTCHA challenge. Every submission that reaches your inbox is from a real person. For product pages with high traffic, this matters more than merchants usually anticipate before they experience the volume of bot submissions an unprotected form attracts.
Step 5: Set the placement
This is where the product page targeting happens. In the Appearance settings, set the display position to Product Page, Footer or Product Page, Below Product Images. If you only want the form on specific products, use the conditional display options to restrict it. Apply it to all products if the form is a general product enquiry form.
Step 6: Go live
Toggle the form to enable and save. The form appears on the relevant product pages immediately. No theme edits. No developer.
Making the Form Work Harder After Setup
Placement and fields are the basics. A few additional configurations turn a passive lead form into an active sales tool.
Connect to Mailchimp or Brevo. The PrestaShop Online Form Builder Module integrates with both. Mailchimp integration means anyone who submits the form gets added to your chosen list automatically. This means every product enquiry becomes an entry point into your email nurture sequence, useful for high-ticket products with longer consideration cycles.
Use conditional logic for complex products. If your product comes in multiple variants or configurations, conditional logic lets you show different questions based on what the customer selects earlier in the form. A visitor selecting “Commercial Use” sees different follow-up fields than one selecting “Personal Use.” This keeps the form short for most customers while capturing more relevant details from those who need it.
Review submissions in the back office. Every submission is logged in the PrestaShop admin panel alongside the form it came from and the date it was submitted. The PrestaShop Survey Module keeps all submission data in one place, filters by form, exports responses, and tracks which product pages are generating the most enquiries. This data tells you which products have the highest interest-to-purchase friction, useful information for product page copy and pricing decisions.
The Outcome This Setup Produces
A PrestaShop lead generation form on a product page does one specific thing well: it captures the interest of visitors who would otherwise leave without a trace.
The visitor who had a question about your product but could not find the answer is now a contact. The B2B buyer researching bulk pricing is now in your inbox. The customer who was not ready to buy today but wanted to know about availability next month is now on your list.
None of that happens if the only call to action on the product page is an Add to Cart button.
The PrestaShop Online Form Builder Module by Knowband handles the full cycle, form creation, product page placement, submission management, and email marketing integration from one place. No code, no external tools, no developer time. The PrestaShop Form Builder is built for merchants who want to act on visitor interest before it disappears.
For more such reads, you can visit:


